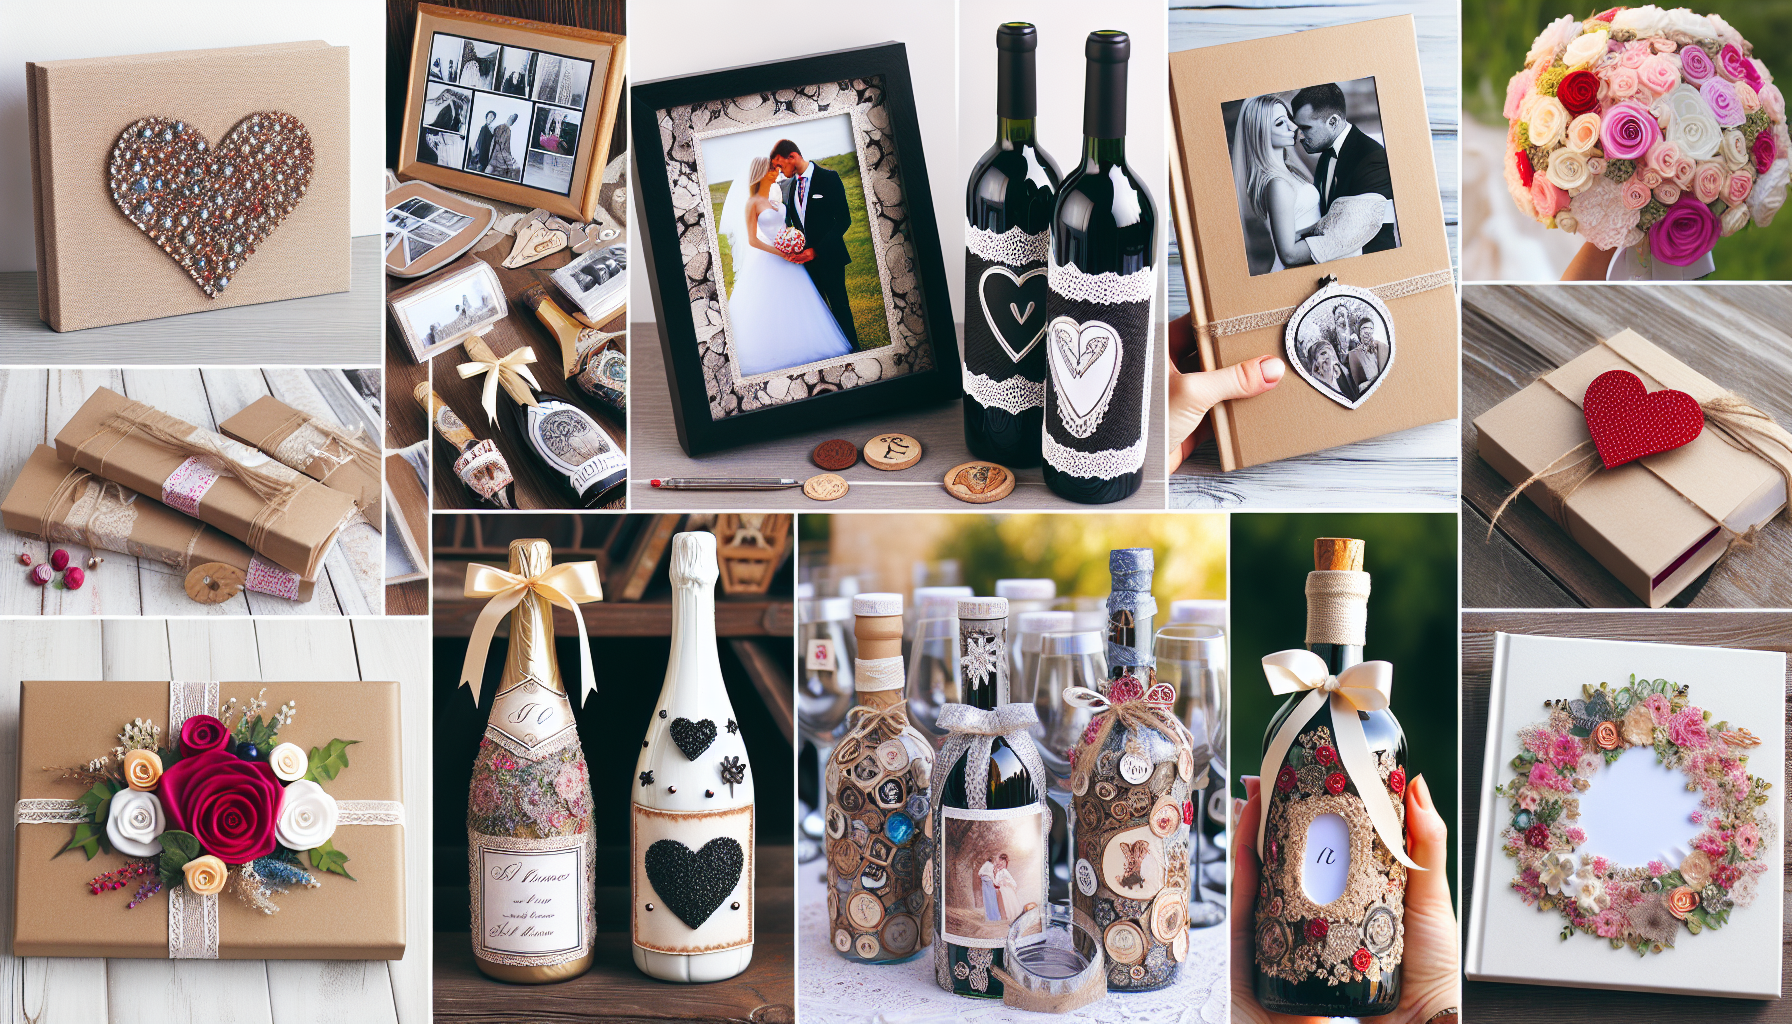
You’re invited to celebrate the union of two lovebirds, and what better way to show your happiness than with a thoughtful and personalized wedding gift? If you’re tired of the standard registry options and want to stand out from the crowd, we’ve got you covered. In this article, we’ll present you with 10 creative DIY wedding gift ideas that will not only impress the couple but also showcase your creativity and love. From customized photo albums to handmade home decor items, these thoughtful presents are bound to make their hearts flutter with joy. Let’s dive into the world of DIY wedding gifts and make their special day even more memorable!
1. Personalized Photo Album
– Materials needed
To create a personalized photo album, you will need the following materials:
- A blank photo album
- Printed photos
- Scissors
- Glue or adhesive tape
- Decorative paper or cardstock
- Markers or pens for writing captions or notes
– Steps to create
Creating a personalized photo album is a wonderful way to showcase memorable moments for the newlyweds. Here are the steps to create your own:
- Gather the photos you want to include in the album. Select a variety of candid and posed shots that capture special moments from the couple’s relationship.
- Arrange the photos in the order you want them to appear in the album. Consider telling a story or highlighting specific events or milestones.
- Cut the decorative paper or cardstock to fit the album pages. This will add a lovely background to the photos and create a cohesive look.
- Use glue or adhesive tape to secure the photos onto the album pages. Be careful not to use too much adhesive to avoid damaging the photos.
- Write captions or notes beside each photo to provide context or sentimental messages. This personal touch will make the album even more meaningful.
- Allow the glue or adhesive to dry before closing the album. Give yourself plenty of time for this step to ensure a professional-looking finish.
– Tips for customization
When personalizing the photo album, keep the couple’s style and preferences in mind. Consider incorporating their wedding colors or theme into the album’s design. You can also add small embellishments like stickers, ribbons, or dried flowers for an extra touch of creativity. Don’t forget to leave some blank spaces throughout the album for the couple to add their own photos or write captions in the future. This will make it an ongoing project that they can enjoy together.
2. Handmade Embroidered Towels
– Materials needed
To create handmade embroidered towels, you will need the following materials:
- Plain white towels or pre-made towel sets
- Embroidery thread in various colors
- Embroidery needles
- Embroidery hoop
- Water-soluble fabric marker
- Embroidery scissors
– Steps to create
Handmade embroidered towels make for a thoughtful and personalized wedding gift. Here are the steps to create your own:
- Choose the design or monogram you want to embroider onto the towels. Keep in mind the couple’s taste and style.
- Use the water-soluble fabric marker to lightly trace the design onto the towel. This will serve as a guide for your embroidery.
- Secure the towel tightly within the embroidery hoop, making sure the marked design is centered.
- Thread the embroidery needle with the desired color of embroidery thread and begin stitching along the marked lines. Use a backstitch or satin stitch for clean and precise embroidery.
- Continue embroidering until the design is complete. Remember to periodically adjust the tension on the hoop to ensure the towel remains taut.
- Once the embroidery is finished, carefully remove any remaining fabric marker lines with water.
- Trim any excess thread with the embroidery scissors, ensuring a neat and polished finish.
– Tips for choosing designs
When choosing designs for embroidered towels, consider the couple’s interests or hobbies. You can personalize the towels further by embroidering their initials, wedding date, or a meaningful quote. If you’re unsure about the design, opt for classic motifs like floral patterns, hearts, or geometric shapes. These designs are timeless and will suit a variety of tastes and styles. Lastly, don’t be afraid to experiment with different colors or thread textures to add dimension and visual interest to the towels.

3. Customized Cutting Board
– Materials needed
To create a customized cutting board, you will need the following materials:
- Wooden cutting board
- Sandpaper or sanding block
- Food-safe wood stain or oil
- Stencils or vinyl letters
- Acrylic paint or wood burning tool (optional)
- Clear sealant spray (optional)
– Steps to create
A customized cutting board is a practical gift that can be both functional and decorative. Follow these steps to create your own:
- Start by sanding the wooden cutting board to make the surface smooth. Wipe away any dust with a clean cloth.
- Apply a food-safe wood stain or oil to protect the wood and enhance its natural color. Follow the manufacturer’s instructions for application and drying time.
- Once the stain or oil has dried, decide on the design you want to customize the cutting board with. You can use stencils or vinyl letters to create a clean and precise design. Alternatively, if you’re comfortable with freehand drawing, you can use acrylic paint or a wood burning tool for a more artistic touch.
- Place the stencils or vinyl letters onto the cutting board and secure them with masking tape to prevent any movement.
- If using acrylic paint, carefully paint within the stencil or letter cutouts. Allow the paint to dry completely before removing the stencils.
- If using a wood burning tool, follow the manufacturer’s instructions to create your design. Take your time and work slowly to ensure precise and even burns.
- Once the design is complete and dry, you can protect the cutting board by applying a clear sealant spray. This will help preserve the design and make it more durable.
– Tips for engraving
When engraving a cutting board, it’s essential to ensure that the materials used are safe for food preparation. Choose a cutting board made from high-quality, food-grade wood, such as maple or bamboo. Avoid using toxic materials or finishes that may come in contact with food. Additionally, consider the couple’s taste and kitchen decor when selecting a design. Personalize the cutting board with their names, last name, or a meaningful quote that relates to cooking or love. Keep in mind that simpler designs often have a timeless appeal and will complement various kitchen styles.
4. DIY Memory Jar
– Materials needed
To create a DIY memory jar, you will need the following materials:
- A glass jar with a lid
- Colored paper
- Scissors
- Pens or markers
- Ribbon or twine (optional)
- Decorative embellishments (optional)
– Steps to create
A memory jar is a heartfelt gift that allows the couple to collect and cherish special moments throughout their marriage. Follow these steps to create your own:
- Cut the colored paper into small strips. The size of the strips will depend on the size of the jar and the desired visual effect.
- Encourage wedding guests to write down a favorite memory, advice, or well wishes for the couple on the paper strips.
- Place the jar and the paper strips near the guestbook or reception entrance for guests to easily access.
- Provide pens or markers of various colors to make the experience more personalized and fun.
- Decorate the jar with ribbon or twine, and add any decorative embellishments, such as charms or miniature photo frames.
- Present the memory jar to the couple along with a note explaining its purpose and encouraging them to read the memories and messages whenever they need a reminder of their loved ones.
– Tips for filling the jar
To make the memory jar even more meaningful, share the idea with the wedding guests in advance. This will give them time to reflect on their memories or prepare heartfelt messages for the couple. Encourage guests to be creative and specific with their memories or advice, as this will make the jar a treasure trove of personalized sentiments. You can also include a few sentimental memories or advice of your own to inspire others. Remember to remind the couple to periodically read and cherish the memories in the jar. It can be a source of comfort and joy, especially during challenging times.

5. Personalized Wedding Vows Artwork
– Materials needed
To create personalized wedding vows artwork, you will need the following materials:
- A beautiful frame
- Thick cardstock or watercolor paper
- Calligraphy pens or markers
- Watercolor paint or colored pencils (optional)
- Ruler
- Pencil
- Eraser
– Steps to create
Personalized wedding vows artwork is a unique gift that celebrates the couple’s commitment to each other. Follow these steps to create your own:
- Measure the dimensions of the frame to determine the size of the artwork.
- Cut the cardstock or watercolor paper to fit the frame.
- Using a ruler and pencil, lightly mark lines on the paper to create even margins and help maintain a straight, organized layout.
- Write out the wedding vows in calligraphy or in your desired style, paying attention to lettering size and spacing.
- Use watercolor paint or colored pencils to add artistic touches or illustrations around the text if desired. Be subtle and ensure the focus remains on the vows themselves.
- Allow the artwork to dry completely before placing it into the frame.
– Tips for selecting fonts and colors
When creating personalized wedding vows artwork, the choice of fonts and colors plays an important role in conveying the right mood and style. Depending on the couple’s preferences and wedding theme, consider elegant and romantic fonts like script or calligraphy styles. These fonts add a timeless and sophisticated touch to the artwork. Choose colors that complement the couple’s wedding colors or decor. Soft, muted tones create a romantic and dreamy atmosphere, while bold, vibrant colors can add a modern and energetic feel. Ultimately, the goal is to create an artwork that reflects the couple’s personality and love story.
6. Homemade Spa Kit
– Materials needed
To create a homemade spa kit, you will need the following materials:
- A decorative container or basket
- Bath salts or bath bombs
- Body scrub or exfoliating brush
- Scented candles or essential oils
- Face masks or moisturizing creams
- Lotion or body butter
- Loofah or bath sponge
- Bubble bath or bath oil
– Steps to create
A homemade spa kit is a luxurious and thoughtful wedding gift that allows the couple to pamper themselves in the comfort of their own home. Follow these steps to create your own:
- Select a decorative container or basket to hold the spa items. Consider the couple’s bathroom decor and choose something that complements their style.
- Fill the container with an assortment of spa essentials such as bath salts or bath bombs, body scrub or exfoliating brush, scented candles or essential oils, face masks or moisturizing creams, lotion or body butter, loofah or bath sponge, and bubble bath or bath oil.
- Arrange the items in an aesthetically pleasing way, considering the different sizes, shapes, and colors. It’s a good idea to place taller items at the back and smaller items at the front for easy access.
- Personalize the spa kit by adding a handwritten note or a small personalized gift tag to convey your heartfelt wishes for the couple’s relaxation and well-being.
– Tips for choosing skincare products
When selecting skincare products for the spa kit, opt for high-quality, natural products that are suitable for a variety of skin types. Look for organic or hypoallergenic options to ensure the products are gentle on the skin. Consider the couple’s skin needs and preferences. For example, if they have dry skin, include moisturizing creams and body butters. If they prefer natural scents, choose products with essential oils instead of artificial fragrances. You can also research popular spa brands that align with your values and provide an indulgent spa experience.
7. Decorative Wine Bottles
– Materials needed
To create decorative wine bottles, you will need the following materials:
- Empty wine bottles
- Acrylic paint or spray paint
- Paintbrushes or foam brushes
- Painter’s tape or stencils
- Clear spray sealant
- Twine, ribbons, or decorative embellishments
– Steps to create
Decorative wine bottles are a versatile and visually captivating gift that can serve as beautiful decor pieces in the couple’s home. Follow these steps to create your own:
- Clean and remove any labels or residue from the empty wine bottles. Soak them in warm soapy water and scrub gently if needed.
- Paint the bottles with acrylic paint or spray paint in the desired colors. You can choose a monochromatic theme or opt for a mix of complementary colors.
- Allow the paint to dry completely before adding any additional designs or embellishments.
- Use painter’s tape or stencils to create geometric patterns like stripes or polka dots. Alternatively, if you’re confident in your artistic skills, you can freehand paint designs or motifs that resonate with the couple’s style.
- Once the additional designs are complete, apply a clear spray sealant to protect the paint and ensure longevity.
- Add twine, ribbons, or other decorative embellishments around the neck of the bottles for an extra touch of charm.
– Tips for adding embellishments
When adding embellishments to the decorative wine bottles, consider the couple’s home decor and personal style. Choose twine or ribbons in colors that complement their existing color scheme. You can also incorporate charms or decorative beads that reflect their interests or hobbies, such as music notes or seashells. Avoid overcrowding the bottles with too many embellishments, as simplicity often enhances their visual appeal. Additionally, consider the purpose of the bottles. If they are intended to be used as candle holders, select embellishments that won’t be flammable or interfere with the safe use of candles.
8. DIY Monogrammed Slate Coasters
– Materials needed
To create DIY monogrammed slate coasters, you will need the following materials:
- Slate tiles or coasters
- Acrylic paint or chalk markers
- Monogram stencils or vinyl letters
- Painter’s tape
- Clear sealant spray (optional)
- Felt or cork backing
– Steps to create
DIY monogrammed slate coasters are a stylish and practical gift that adds a personal touch to the couple’s home. Follow these steps to create your own:
- Clean the slate tiles or coasters to remove any dust or debris. If necessary, wipe them with a damp cloth and allow them to dry completely.
- Lay out the monogram stencils or vinyl letters on the coaster to create the desired monogram or initials. Ensure they are centered and evenly spaced.
- Use painter’s tape to secure the stencils or vinyl letters to the coaster, preventing any movement during painting.
- Paint within the stencils or vinyl letters using acrylic paint or chalk markers. Choose colors that complement the couple’s decor or wedding colors.
- Allow the paint to dry completely before carefully removing the stencils or vinyl letters. Take your time to avoid smudging the design.
- If desired, apply a clear sealant spray to protect the paint and ensure the coasters are water-resistant. Follow the manufacturer’s instructions for application.
- Attach felt or cork backing to the bottom of the coasters to protect the surfaces they will be placed on and prevent scratches.
– Tips for selecting monogram fonts
When selecting monogram fonts for the slate coasters, consider the couple’s style and the overall aesthetic they prefer. Classic and elegant fonts like script or serif styles often work well for monograms. These fonts have a timeless appeal and can suit a variety of design preferences. Experiment with different combinations of initials or monograms to find a design that best represents the couple. Additionally, consider the size of the coaster and the legibility of the chosen font. Opt for fonts that are easy to read and won’t appear cramped or distorted on the coaster’s surface.
9. Personalized Recipe Book
– Materials needed
To create a personalized recipe book, you will need the following materials:
- A blank notebook or binder
- Decorative paper or cardstock
- Printed recipe cards or recipe printouts
- Scissors
- Glue or adhesive tape
- Page protectors or sheet protectors
- Dividers or tabs
– Steps to create
A personalized recipe book is a thoughtful and practical gift that allows the couple to preserve and organize their favorite recipes. Follow these steps to create your own:
- Start by selecting a blank notebook or binder to serve as the foundation for the recipe book. Choose a size that provides enough space for recipes, notes, and additional pages.
- Cut the decorative paper or cardstock to fit the cover and spine of the notebook or binder. This will add a personalized touch and protect the pages.
- Attach the decorative paper or cardstock to the cover and spine using glue or adhesive tape. Smooth out any wrinkles or air bubbles for a neat finish.
- Print out the selected recipe cards or recipe printouts. Consider the couple’s favorite recipes or family traditions for inspiration.
- Trim the printed recipe cards or printouts to fit the desired size for the book. Alternatively, you can use page protectors or sheet protectors to preserve full-sized recipes without cutting them.
- Use glue or adhesive tape to secure the recipe cards or printouts onto the pages of the notebook or binder. Alternatively, slip the recipes into page protectors or sheet protectors.
- Organize the recipes into sections by adding dividers or tabs. Consider organizing them by categories like appetizers, main courses, desserts, or cuisines.
- Leave some blank pages at the end of each section for the couple to add their own recipes or notes in the future.
- Personalize the recipe book further by adding hand-drawn illustrations, sentimental quotes, or family photos alongside the recipes.
– Tips for gathering and organizing recipes
When gathering recipes for the personalized recipe book, consider reaching out to friends and family members for tried and tested family recipes. Ask them to share their favorite recipes that hold sentimental value or that the couple has enjoyed together. Additionally, you can include blank recipe cards with the gift, encouraging the couple to write down their own recipes or document new culinary creations. When organizing the recipes, consider the couple’s cooking habits and preferences. If they enjoy experimenting with different cuisines, consider organizing the book based on worldwide regions or specific countries. Alternatively, if they have dietary restrictions or preferences, organize the recipe book accordingly, separating recipes into categories like gluten-free, vegetarian, or dairy-free.
10. Handcrafted Wall Art
– Materials needed
To create handcrafted wall art, you will need the following materials:
- Canvas or wooden board
- Acrylic paint or watercolor paint
- Paintbrushes or sponge brushes
- Pencil or sketching materials
- Eraser
- Sealer or varnish (optional)
- Picture hanging hardware
– Steps to create
Handcrafted wall art is a meaningful and visually stunning gift that allows the couple to personalize their living space. Follow these steps to create your own:
- Choose the canvas or wooden board size and shape that suits the couple’s preferences and complements their home decor.
- Use pencil or sketching materials to lightly outline the design or motif you want to create. Consider the couple’s interests, hobbies, or meaningful symbols when selecting the design.
- Select the appropriate paint colors for your chosen design. Consider the couple’s existing color scheme or opt for colors that evoke emotions or memories associated with the design.
- Paint the design using acrylic paint or watercolor paint. If necessary, apply multiple coats to achieve the desired opacity or vibrancy.
- Allow the paint to dry completely before applying any additional layers or details. This will prevent smudging and ensure clean lines.
- If desired, add further details or highlights using complementary colors or different paintbrushes.
- Once the paint is completely dry, apply a sealer or varnish to protect the artwork and enhance its longevity. Follow the manufacturer’s instructions for application.
- Attach picture hanging hardware to the back of the canvas or wooden board, ensuring it is securely fastened.
- Present the handcrafted wall art to the couple along with a note explaining the inspiration behind the design and expressing your well wishes for their home.
– Tips for choosing themes or motifs
When choosing themes or motifs for handcrafted wall art, consider the couple’s personalities, interests, or shared experiences. Incorporate elements that hold special meaning to them, such as favorite travel destinations, nature, animals, or quotes that inspire them. Consider the style and ambiance of their home when selecting the design. If they prefer minimalism, choose a simple and clean design. If their decor is more eclectic, feel free to experiment with bolder colors and complex patterns. Remember, the handcrafted wall art should reflect the couple’s individuality and create a visual statement in their living space.